In today’s College Prep post, I’ll walk you through setting up a new Gmail (Google email) account, and let you know ways I’ve tweaked Gmail to help me be organized and efficient.
But I have an email account through school/work/my Internet provider!
Fair enough. And if you’re happy with it, you can keep using it. Even if you’re going to stick with your non-Gmail email account, setting Gmail up to archive your messages in the background means that you’ll have amazing search options for your email when you want them.
The other benefit of having a Gmail account: you won’t lose your account when you change schools, jobs, or internet providers. Also, your online presence isn’t tied to your school or a company, and your employer will have a tougher time accessing your mail.
Even if none of these reasons convince you, having a Gmail account means that you have a Google account, the golden key that unlocks so many other useful services!
Creating Your Account
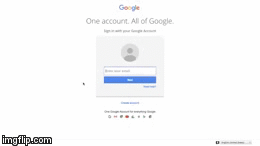
Go to accounts.google.com and click the link at the bottom to “Create account”.
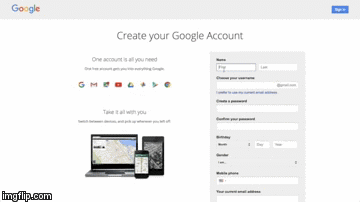
Hopefully you did your homework from the first post, and have a list of possible usernames to try out. Keep trying until you find one that isn’t claimed. Google will ignore ‘dots’ in your username, so First.Last@gmail.com is secretly the same as FirstLast, F.i.r.s.t.Last, F.irst.Last, … you get the idea.
Pick a password! Make it awesomely un-hackable. If you’re terrible at creating complicated passwords and don’t like the idea of storing your passwords with a program like LastPass, then QuertyCards seems like a great semi-luddite idea.
Make sure you also include your current email address… this will come in handy if your super excellent password slips out of your brain and you can’t get into your account.
Clean Up Your Inbox
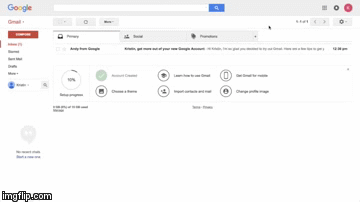
Google is very good at organizing data, and thinks that they can figure out how to sort your email into Primary/Social/Promotions/Updates/Forums tabs. For me, having all of these tabs means that I lose track of emails, so I strongly recommend ditching all of the extra inbox tabs. To do this: There’s a gear symbol in the top right. Click on it and then select “Configure inbox.” Deselect everything except for Primary. While you’re hanging out in the gear menu, notice you can mess with the “Display density”. This is how you’ll be able to see more or fewer emails on one screen (it controls how much padding or visual space there is above and below each email). We’ll play more in the settings menu later, for now just poke around and explore.
Archive is your new best friend
In general, you never want to delete an email. Simply click on the “Archive” button and it will disappear from your inbox. However, if you want to see it, there’s a “More” option on the left side which will show you “All Mail”. Every message you’ve sent and received lives there. If you don’t want to dive into your archives, you can use the search bar across the top, which will search all mail that you haven’t deleted.
Fun with Settings
Finally, you’ll probably want to change some settings. These are all located in the settings menu that you can access from the gear-shaped icon on the top right. Your best bet is to just go in and explore all of the tabs within the settings menu. “Labels” allow you to attach labels to any message, and a message can have more than one label. For example, a message from your mom with a recipe for your favorite pasta sauce might end up with a “Family” label and a “Recipes” label. “Filters” allow you to treat all messages of a certain type the same way – for example, you can automatically apply the “Family” label to messages from your mom’s email address. I like to create a filter for each of my social media accounts: any email from: *@facebook.com (any address that ends in @facebook.com) gets archived and put into a folder I call “Social”. That way all of my friends’ status updates don’t clog up my inbox. I also create labels & filters for “Money” (bills and bank statements), “Family” (messages from anyone in my family), and for any big project I’m working on.
The Accounts & Import tab will be the tab to play in if you want to also use your old email address. You can set it up to send mail as your old email address as well as the new one you just created. You can also get Google to check (and pull into your Gmail account) all of the new email on your old account using POP3.
I love some of the mini-applications in the “Labs” tab, try some out and see if you like them. If you change your mind, you can always go back later and un-select it.
Gmail vs Inbox
Finally, Google has a different version of it’s email program, called Inbox (we’ve been playing in Gmail). To get to Gmail, type “mail.google.com” into your browser. To try out Inbox, type “inbox.google.com”. Personally, I vastly prefer gmail, because it lets me have so much control with filters and because I really like some of the options in Labs. I also like that I can see so many emails at once. However, Inbox has this AMAZING option called “snooze”, which lets you tell an email to archive for a fixed period of time, and then pop back into your inbox. This is amazing for any email you need for one reason or another, but not right now. It’s great for flight information – snooze it until the day before your flight. For package deliveries – snooze until the day of delivery. For party invitations – snooze until the day of the party… you get the idea. I keep hoping the Google will implement snooze into regular Gmail, but so far no luck. I suggest trying both Gmail and Inbox out and seeing which you prefer.
How’d it go? Did you hit a snag creating your account? Do you have any other questions about how to do things in Gmail or Inbox? Let me know in the comments!
All posts in the College Prep series will appear at this link (as soon as they’re published).
- Post 0: Introduction
- Post 1: Email – setting up GMail (this post!)
- Post 2: Calendar – setting up GCal
- Post 3: Holding Yourself Accountable (coming soon!)